I’ve been enjoying playing with the new Siri Intents in iOS 12, and obviously didn’t need much of an excuse to get my Yeltzland app on yet another platform!
Shortcuts from NSUserActivity
It was pretty easy to get some basic integrations with Siri Shortcuts working. I was already using NSUserActivity on each view on the app to support Handoff between devices, so it was quite simple to extend that code for Siri shortcuts.
For example, on the fixture list page I can add the following:
    // activity is the current NSUserActivity object

    if #available(iOS 12.0, *) {
        activity.isEligibleForPrediction = true
        activity.suggestedInvocationPhrase = "Fixture List"
        activity.persistentIdentifier = String(format: "%@.com.bravelocation.yeltzland.fixtures", Bundle.main.bundleIdentifier!)
    }
Making the activity eligible for Prediction means it can be used as a Siri Shortcut, and obviously the suggested invocation phrase is a hint for when you open the shortcut in Settings to be able to open the app directly on the Fixture List view from Siri.
Building a full custom Siri Intent
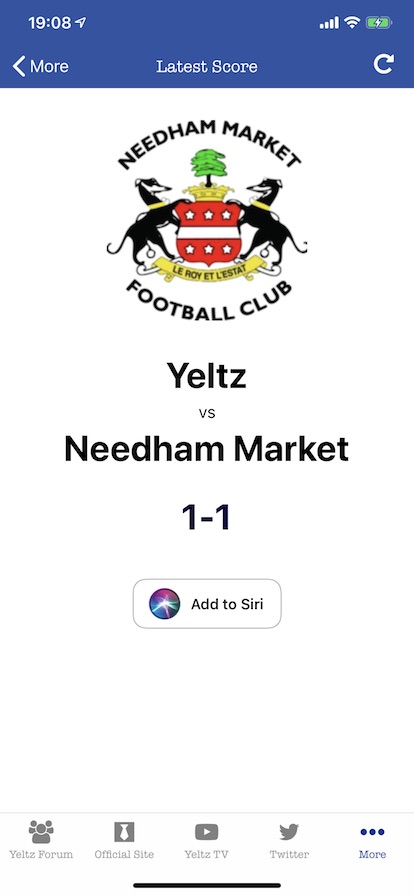
Probably the most useful app feature to expose via a full Siri Intent is the latest Halesowen score. By that I mean an intent that will speak the latest score, as well as showing a custom UI to nicely format the information.
There are plenty of good guides on how to build a custom Siri Intent out there, so I won’t add much detail on how I did this here.
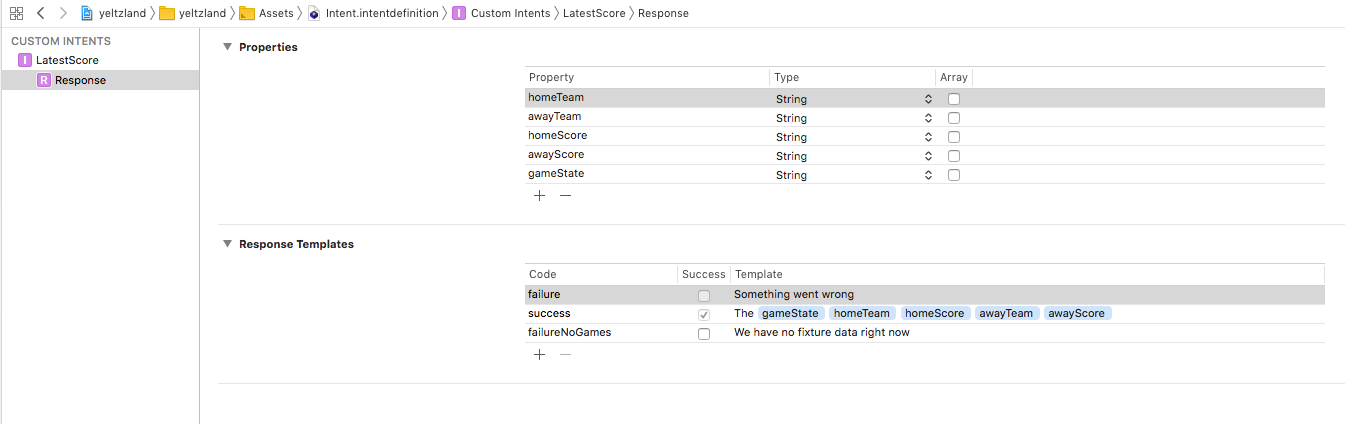
However one strange issue I couldn’t find a work around for was that, when trying to put a number as a custom property in the Siri response, I couldn’t get the response to be spoken.
As you can see from the setup below, I got around this by passing the game score as a string rather than a number, but I wasted a long time trying to debug that issue. Still no idea why it doesn’t work as expected.
Building a custom UI to show alongside the spoken text was also pretty easy. I’m quite happy with the results - you can see it all working in the video below
To make the shortcut discoverable, I added a “Add to Siri” button on the Latest Score view itself. This is really easy to hookup to the intent by simply passing it in the click handler of the button like this:
    if let shortcut = INShortcut(intent: intent) {
        let viewController = INUIAddVoiceShortcutViewController(shortcut: shortcut)
        viewController.modalPresentationStyle = .formSheet
        viewController.delegate = self
        self.present(viewController, animated: true, completion: nil)
    }
It was a lot of fun hooking everything up to Siri, and I’m really pleased with how it all turned out.
Overall I think opening up Siri to 3rd party apps could be game-changing for the platform. Previously Siri was so far behind both Google and Amazon it was almost unusable except for the most basic of tasks. However, now it can start working with those apps you use all the time, I can see it being a truly useful assistant.
Siri is still a way behind of course, but once custom parameterised queries are introduced - presumably in iOS 13 - and if the speech recognition can be improved, it is definitely going to be a contender in the voice assistant market.
I’m also looking forward to Google releasing their similar in-app Actions at some point soon.
This definitely falls into the category of “it fixed it for me” - your mileage may vary.
I’ve been having assorted problems with my BT Infinity broadband service. For a while they insisted it was a router problem (it wasn’t) and sent me a new BT Homehub router to use. The router is actually fine and I’ll probably stick with it, but for some reason Xcode wireless debugging stopped working.
I could install an app from Xcode fine, but the debugger failed to start and attach to the app on my phone. My guess was it was a port issue, but had no real idea what was actually going on.
I didn’t find anything online, but playing about with the Homehub settings, I found I could turn “Enable SIP ALG” on (in Advanced Settings > Firewall > Configuration) which sounded suspicious. I turned it on, and now the wireless debugging works as before. Hurrah!
I’ve no real idea if this was actually the culprit, but thought I’d at least share this in case others hit the same issue, as it’s something to try.
Things if announced next week would make me very happy
Following on from this week’s Connected, I thought I’d do my own wish list/happy list for WWDC 2018.
Here are my top 5 hopes for next week’s announcements …
1. Siri improvements
Siri is currently so far behind Alexa and Google Assistant it’s a joke - not just on quality of results but because of the very restricted set of domains developers respond to.
I’d love it if a much more flexible way of returning results was introduced. In particular, let developers develop their own intents and grammars to parse Siri queries - just like Alexa and Google do - and not have to wait for Apple to support individual problem domains at their glacial pace.
Bonus happiness if Apple Watch apps could hook into the potentially very useful but currently very limited Siri watch face.
2. Cross platform development
I don’t really believe the rumours of ‘Project Marzipan’, but it would be fantastic if a cross-platform iOS/Mac development platform is announced.
I definitely think some of my iOS apps could potentially work well on the Mac, but I’m not really going to consider porting them unless it was very little work.
Partial happiness if support for pointing devices/mice/trackpads is announced for iOS. Would sure make using my iPad Pro as a work machine a bit easier, and probably a requirement for any cross-platform support going forward.
3. Updated Mac Mini
I used to have a Mac Mini, but it was increasingly underpowered as a development machine so I switched to a 2015 MacBook Pro a couple of years ago.
I can’t really justify splashing out on an iMac right now (or even more an iMac Pro at those prices!), but I’d love a reasonably priced desktop I could use as a development machine - especially one that was always on that I could remote into as necessary.
4. Better WatchKit or full UIKit on Apple Watch
Apple Watch hardware is becoming increasing more powerful, and now mobile connectivity is supported. It has the potential to be really useful for some use cases.
However right now it’s really painful to make any sort of rich interface on Watch with the very limited WatchKit frameworks.
Clearly Apple’s own apps use another more powerful framework - UIKit? - and it would be great if developers are allowed access to this too.
5. Real-time Watch complications
Another missed opportunity on the Watch is being able to update complications on the watch faces in real-time.
The strength of the watch is having time-relevant information presented when you need it. However watch face complications can only be updated on a very restricted schedule, which makes lots of great ideas for real time info right on the Watch almost impossible.
I understand why the underpowered original watches were restricted to occasional complication updates, but we really need move past these restrictions if we want to move the platform forward.
If this means leaving Series 0 Watch owners behind - and I’m one of them at the moment - so be it.
Summary
To be honest I’m not really expecting any of these five things to be announced. I’d be pretty happy if any of them are, very happy if 2 or more are, and if all 5 were it would be a miracle!
Building my first action for Google Assistant, and how it compares to developing for Alexa
I’ve been pretty much all-in on the Amazon Echo as my home voice system, and still loving having multiple devices around our home we can call out commands to.
This is a summary of what I learnt doing that, and my view on the advantages and disadvantages of developing for each platform.
Actions on Google Advantages
Also available on phones
The main advantage of Google Assistant - one I hadn’t realised until I started this, even though it’s actually pretty obvious - is that it’s available on phones as well as the Google Home speaker.
On newer Android phones Google Assistant might be installed out of the box (or can be installed on recent versions), and there is also a nice equivalent iOS app.
I’ve just bought a Google Home Mini to try out, and it’s definitely is comparable to the Echo Dot it sits next too, but I’ve found myself using Google Assistant a lot more on my iPhone than expected.
Visual responses are nicer
Because the Google Assistant apps are so useful, there is a lot more emphasis in returning visual responses to questions alongside the spoken responses.
Amazon does have the Echo Show and the Echo Spot that can show visual card information, but my uneducated guess is they make up a small percentage of the Echo usage.
Google offers a much richer set of possible response types, which not unsurprisingly look at lot like search results answers.
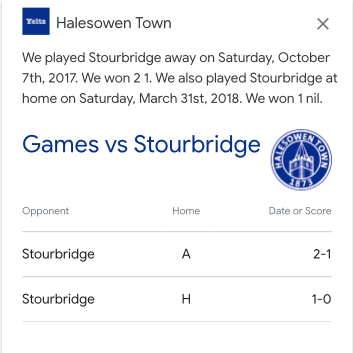
In particular, the Table card - current in developer preview - offers the chance to provide really rich response which suit the football results returned by my answer very well.
Nice development environment
Both the Actions on Google console (used for configuring and testing your action), and the Dialogflow browser app (used for configuring your action intents) are really nice to use.
Amazon has much improved their developer tools recently, but definitely a slight win to Google here for me. In particular, for simple actions/skills Dialogflow makes it easy to program responses without needing to write any code.
Using machine learning rather than fixed grammars to match questions to intents
Google states it’s using machine learning to build models that match questions to your stated intents, whereas Amazon expect you to be specific in stating the format of the expected phrasing.
Now from my limited testing - and since I’m basically implementing the same responses on both platforms - it’s hard to say how much better this approach is. However, assuming Google are doing a good job (and with their ML skills it’s fair to assume they are!), this is definitely a better approach.
Allowing prompts for missing slot values
Google has a really nice feature where you can specify a prompt for a required slot if they’ve matched an intent, but not been able to parse the parameter value.
For example, one of my intents is a query like “How did we get on against Stourbridge?” where Stourbridge is an opposition team matched from a list of possible values.
Amazon won’t find an intent if it doesn’t make a full match, but on Google I can specify a prompt like “for what team?” if makes a partial match but didn’t recognise the team name given, and then continue on with the intent fulfilment.
Actions on Google Disadvantages
Couldn’t parse “Yeltzland” action name
A very specific case, and not a common word for sure, but Google speech input just couldn’t parse the word “Yeltzland” correctly. This was very surprising, as I’ve usually found Google’s voice input to be very good but it kept parsing it as something like “IELTS LAND” 😞
You also have to get specific permission for a single work action name - not really sure why that is - so I’ve had to go with “Talk to Halesowen Town” rather than my preferred “Talk to Yeltzland” action invocation. It all works fine on Amazon.
SSML not as good
A couple of my intents return SSML rather than plain text, in an attempt to improve the phrasing of the responses (and add in some lame jokes!).
This definitely works a lot better on the Echo than on Google Assistant.
What about Siri?
All this emphasises how far behind Siri is behind the other voice assistants right now.
Siri is inconsistent on different devices, often has pretty awful results understanding queries, and is only extensible in a few limited domains.
I really hope they offer some big changes in next week’s 2018 WWDC - maybe some integration with Workflow as I hoped for last year, but I really don’t hold much hope any more they can make significant improvements at any sort of speed. Let’s hope I’m wrong.
Conclusion
As you can tell I’m really impressed with Google’s offering here, and definitely seems slightly ahead of Amazon in offering a good development environment for developing voice assistant apps.
In particular, having good mobile apps offering the chance to return rich visual information alongside the voice response is really powerful.
My “Halesowen Town” action is currently in review with Google (as of May 30th, 2018), so all being well should be available for everyone shortly - look out for the announcement on
Twitter!
P.S. If you are looking for advice or help in building out your own voice assistant actions/skills, don’t hesitate to get in touch at johnp@bravelocation.com
How I setup some simple unit tests for my Alexa Lambda function, so I could refactor it with confidence without breaking my skill
After watching last week’s fascinating Google I/O Conference, I’ve been thinking about porting my Yeltzland Alexa Skill to Google Assistant.
The Alexa Skill runs as an AWS Lambda function, and as it was my first attempt at writing a skill the code wasn’t particularly well designed for reuse.
Therefore I thought it was a good idea to find out how to:
Run AWS Lambda code locally
Write some unit tests against the code to check it’s running correctly
Refactor the code to extract the reuseable business logic into a separate module, ready for reuse (using the unit tests to check I haven’t introduced any regressions)
Running AWS Lambda code locally
There are some great tools from Bespoken that make it pretty easy to run your AWS Lambda code locally.
The steps are as follows:
Install npm install bespoken-tools -g
Start the proxy server by running bst proxy lambda index.js where index.js is your Lambda code module
This sets up the Lambda function listening on http://localhost:10000 for requests.
Writing unit tests against the Lambda code to check it’s running correctly
Firstly, I wrote a simple test harness that would build some JSON in the same format as an Alexa request, which then POSTs to the proxy server setup as above and checks the response.
My skill uses dynamic data (my football team’s fixtures and results) that changes over time, so for my unit tests I just wanted to check the first part of the response - generally the non-dynamic part.
This was sufficient for my refactoring efforts, and I didn’t want to go to the effort of mocking the data requests part of my code right now.
I then wrote some simple Mocha unit tests to call each of my skills intents, and verify the response was basically as expected.
Refactoring the code
By adding the following sections to my package.json file, it makes it easy to simply run npm test to run all of the unit tests:
I then moved all of by business logic to a separate yeltzland-speech module, and checked the tests still passed after each change, and I’m pretty confident I didn’t introduce any problems even though the code logic has been significantly refactored.